s The Kim Six Fix: Bathroom
What is New?
Showing posts with label Bathroom. Show all posts

Hamptons Inspired Bathroom Makeover

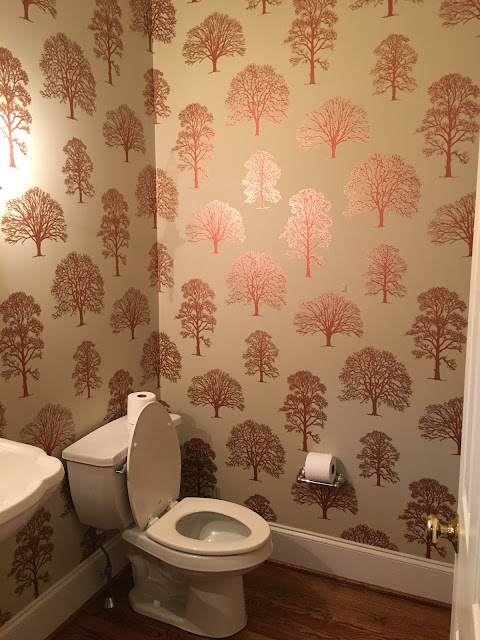
Our new house has a powder room that was wallpapered within an inch of its life when we bought the house, so I decided it needed a makeover.   

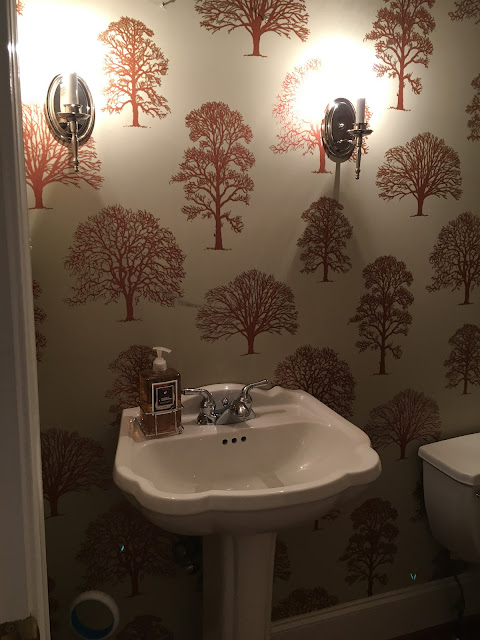
The wallpaper was actually METALLIC and shined in the light. Which was cool, but the copper color wasn't really in my color scheme.


Not to mention,  it had no mirror and some really old fashioned colonial style sconces.  Whut? 

PLUS A SEASHELL SINK. OMG NO. Since my style isn't south Florida meets George Washington, it was on my list of crap to change as soon as we moved in.

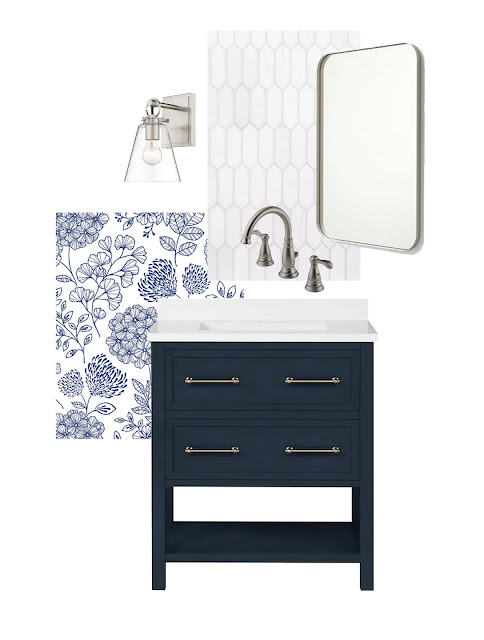
Our new house has a color theme of navy, blue and turquoise with a touch of Hamptons/Nautical and a touch of Farmhouse.  Nothing too rustic and nothing to themey.. so this was my vision of the bathroom.

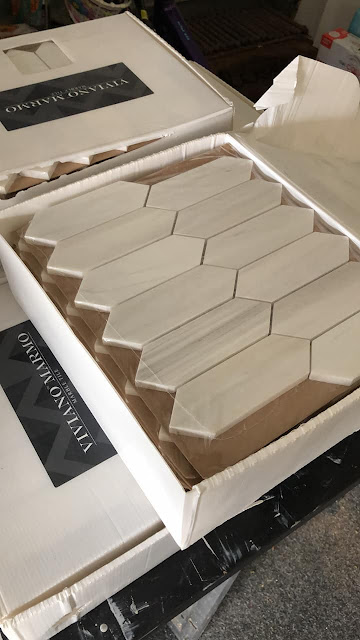
We toured a house when we were house hunting that had the most amazing bathroom with a single tiled 'accent' wall and I knew I wanted to do that behind the sink and toilet.

The walls got damaged pretty badly getting the wallpaper off, so I didn't want to paint.  I decided I would need to re-wallpaper. 

So here is the vision: 


Navy and white, to go with the rest of the house's color scheme.  I also have used a lot of chrome in the house, so I decided to stick with silver accents instead of the currently trendy brushed gold.  

So far, I've purchased the vanity, wall paper, faucet and tile.  And so I'm going to record those costs here and just update the budget as we go along.

Tile: $997 (60 square feet plus thinset)


Vanity: $447
Delta Faucet: $82 (I got a refurb on clearance)
Wallpaper: $324
Total spent so far: $1850

I have the sconces and the mirror in my shopping basket but haven't pulled the trigger yet.


Easy 5 Dollar Floating Shelves

Wall to wall floating shelves in bathroom
How to Install floating shelves on a budget
I recently redid my master bathroom water closet, and one of the things the space needed was storage, so I added some simple shelves to the room.

There are a million ways to install shelves, but when you are going the completely width of the space, putting the supports on the side walls is definitely the easiest and the most budget friendly.

My shelves cost a whopping total of: $5

Water Closet Makeover

Water Closet with Dark Accent Wall Before and After
Thanks to Dunn Edwards for sponsoring this post
A few years ago, you may remember my master bathroom was completely made over.  I pulled out the horrific 'faux marble' and put in tumbled travertine and glass pencil tile.


I also replaced all the mirrors and replaced the counters, painted the vanity and added new cabinetry. 
But the one part of the bathroom that was untouched..  the water closet (which housed the toilet). It was a funny little room with an angled door.   I never really mentioned it in that series of posts, since it was sort of it's own room, and keeping it all builder white seemed good enough.
Water closet with angled entry door
But now that is has been two years, I thought maybe it was about time to get that little room to match it's big brother.. and so it was WATER CLOSET MAKEOVER TIME and Dunn Edwards was going to help!

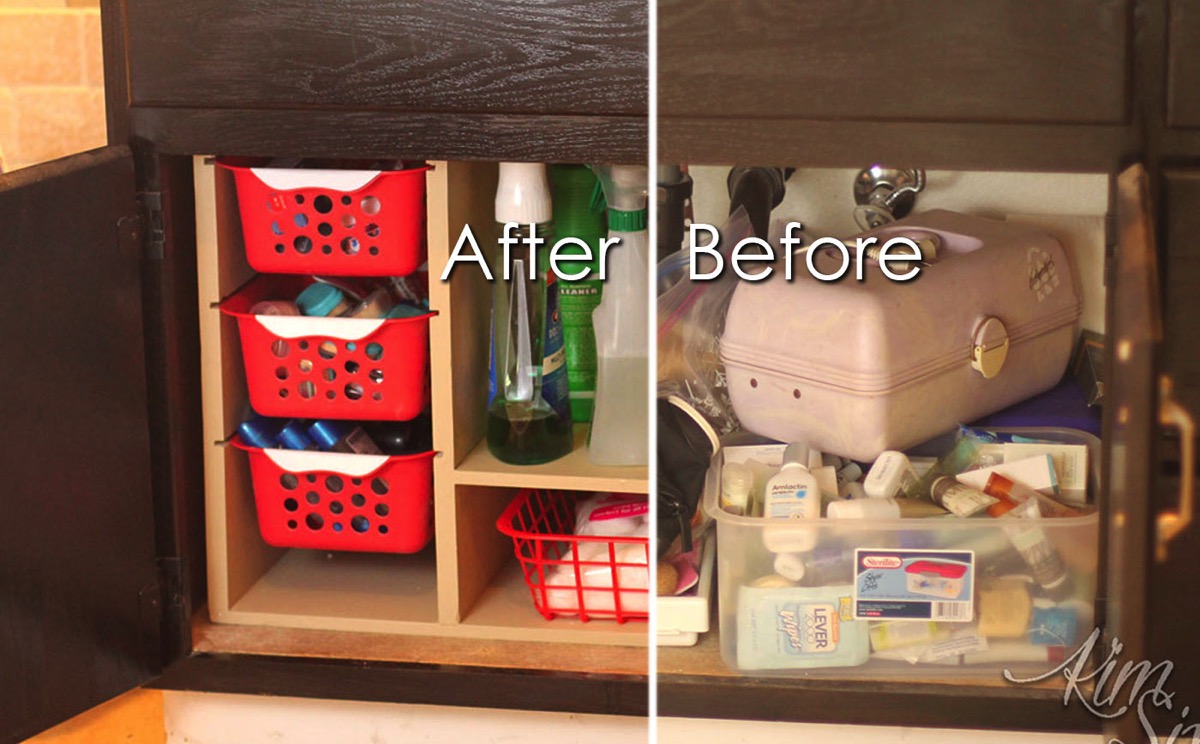
Undersink Cabinet Organizer with Pull Out Baskets

Undersink cabinet organized with dollar store baskets
A ton of fantastic DIY organizing projects that you can build yourself.

Once again it is time to head out to the workshop and get my hands dirty with some POWER TOOLS!  Yay!   The theme this month is ORGANIZING!

My contribution is this undercabinet organizer with pull out baskets.
From a single sheet of plywood  and some dollar store bins she built this fabulous organizer. What a great way to use all that awkward space under the sink!   Undersink Cabinet Organizer with Pull Out Baskets.   via TheKimSixFix.com

Staging Your Bathroom for Holiday Guests

Bathroom for holiday guests
The holidays are the one time of year when we have frequent house guests.  Even if you aren’t a regular ‘dinner party’ kind of family, if you ARE going to host people for dinner at your home, Thanksgiving is probably the time you do it.


And in order to make those guests feel at home, you want your house to feel welcoming. Typically we focus on the obvious rooms, like the dining room or living room, but it is the little touches that will always stand out.   And one place you may be overlooking is your guest bathroom.  I not only decorate my bathroom for the holidays, I also make it more guest friendly. 

How To Miter Crown Molding at ANY Angle

How to Miter Crown Molding with Odd Angles
I have a confession to make.  Remember when I redid my master bathroom and I installed a corner cabinet on the vanity? Remember I said I was going to install crown molding on that cabinet to finish the room?   Yeah.. you probably forgot about that since it was TWO YEARS AGO.

Well. I NEVER did it.  I was having a hard time figuring out how to miter the crown at the funky angles resulting from the weird cabinet shape.  And I only had EXACTLY 6 feet of matching crown from the cabinet company. I was paralyzed with fear of screwing it up.

How to Choose and Install a Low Flow Toilet

How to Choose and install high efficiency toilet. Everything you need to know before heading to the home improvement store.

If you are using toilets installed anytime in the last century (okay.. it sounds crazy when I say it that way.. but I mean “Pre-2000”) it is pretty likely that you are either using way more water than you have to, or are using outdated technology which conserves water but is not very efficient at flushing waste or frequently clogs.

The toilets in our house were 1988 monsters using almost 4 gallons per flush. (For perspective, todays standard of “low flow” is 1.28 gallons.) If you are using a toilet from the 70s, you could be using as much as seven gallons!  SEVEN GALLONS!!  That is the equivalent of flushing a modern toilet more than five times.  (Side note: if you are using toilet from the 70s.. it is probably pretty gross by now and you should change it anyhow!)
Low Flow Toilet Options
Today’s low-flow toilets are pretty amazing, considering that some of them use as little as 0.8 gallons of water and yet have astounding ability to flush a small pony down the drain (okay, maybe that is a slight exaggeration.. but they are much more powerful than their previous water saving counterparts.)

I’ve previously written about the pros of saving on your utility bills, and so this project was a no brainer.  And to make it even better, our utility district has a $50 rebate on any Water Sense toilet, so this project practically paid for itself.  (Most water districts do offer rebates, just check with your local company.)

In our upstairs bathrooms these are the toilets we had:
High water usage toilet
You can see how large the tank was in order to hold all the water.

It was just a huge WASTE even though they weren't in the most commonly used bathrooms.  I chose a new 1.28 gallon per flush American Standard model as a replacement.   I took a side by side photos with the new one (the ruler is for reference) to show you the difference in tank size when you covert to a water efficient model
Replacing low flow toiletYou also will notice the tank is tapered, to give you more flushing power with less water.   Plus it takes up less space in your bathroom, which is never a bad thing right?

So how did I decide exactly which one was the best choice for me? 

When figuring out what kind of toilet you want to upgrade to, there are lots of things to keep in mind.

TOILET SELECTION:

Powder Room Makeover: Flashback Friday

Powder room makeover
Since my last post featured my mom’s new powder room ceiling, which was inspired by *MY* powder room’s beadboard ceiling, I thought that i was only appropriate that for Frlashback Friday this week, I feature my entire Powder Room Makeover.

How to Install a Beadboard Paneled Ceiling

How to Install Beadboard Ceiling
On my summer trip to my mom’s house, one of the project she asked me to work on was paneling her bathroom ceiling.  She had seen my powder room ceiling and decided she wanted something similar.

My mom actually has a beautiful bathroom (check out that oval window!), but the ceiling was pretty bland:
Ceiling before
The rest of the room has very traditional features like marble counters and a chrome cross handled faucet, so beadboard was completely appropriate:Red bathroom with marble

5 Steps To Finding The Perfect Bathroom Style

5 steps to find your style


This post brought to you by DecorPlanet.com. All opinions are 100% mine.

One of the most common things I have heard since doing my bathroom remodel is “How did you know where to start?  I hate my bathroom but the options are overwhelming.  I’m paralyzed with indecision.  What if I screw it up?"

I think that is a really hard problem for a lot of people.  Especially people with tiny budgets, since you only have one shot at it.  You want to really LOVE the finished product and you don’t want to make the wrong choices.  We aren’t professional designers or plumbers or contractors, and usually we can’t define our style much farther than “I’ll know it when I see it"

So today I thought I’d share MY process of how I make decisions when redoing my bathrooms and how I decide on what style I want.

I have re-done quite a few bathrooms.  Some were quick and easy fixes while others were much more extensive. And in all of the cases I started with a similar game plan: 

Step 1: DO YOU ACTUALLY WANT IT TO BE YOUR STYLE? 
What are your goals? Is this going to be your bathroom? A guest bathroom? A child’s bathroom?
Are you going to live in your home for a long time or are you thinking you may soon sell it?

Do you need it to have universal appeal or is going to be your private sanctuary?  
Does your house already have an overall style and therefore the bathroom needs to blend in or do you have carte blanche to do anything?

Step 2: DEFINE YOUR STYLE

Updating A Vanity with A Custom Tile Backsplash

Custom Vanity Backsplash
During my recent trip to the Haven Conference, I stopped by my parents’ house and helped them with a couple of DIY projects they have been waiting to tackle.  One of them was upgrading the builder grade backsplash they had in their master bathroom.

The bathroom is beautiful, but my mom wanted to unite the tile work in the shower with the other side of the room.  Since she had pencil tile leftover from the shower construction, we decided we would use it for a new backsplash.

Updating a Brass Medicine Cabinet (Flashback Friday)

How to Spray Paint Medicine Cabinet
When I updated the guest bathroom, one of things I didn’t want to replace was the built in medicine cabinet.  However, the problem was that the medicine cabinet was brass.  Yes.. I know brass is supposed to be ‘trendy’ right now, but I am not a golden shiny brass kind of girl.

Unlike the brass sliding shower doors, which I removed or the lighting fixtures and faucet, which I replaced, the medicine cabinet needed to be transformed. And it needed to be transformed without being removed.

The key to this transformation was this:

Guest/Kid Bathroom Makeover (Flashback Friday)

Friday already? The days are just flying!  I’m still working on getting all my spring and Easter stuff up, but today I am taking a break to post the relatively dramatic change that happened in the kids’ bathroom (which also is the guest bathroom) with nothing much more than paint and a little lumber.

The full original reveal from 2011 can be seen here, and here is what it looks like today, more than 3 years later.

The first thing I did was take down the old brass sliding shower door and replaced it with a curtain (Full tutorial on that is a previous flashback Friday post)
Removing shower door
We lived with the bathroom for a while like this until I couldn’t stand it for one more minute and decided it was time for a major (albeit cosmetic) overhaul.

I painted the walls (Martha Stewart’s Buckwheat Flour) and added a window treatment.  I didn’t want a color that was too dark, but I needed a lot more contrast between the molding and the walls.  Bathroom window remodelAlso, a quick tip: See how the curtain/valance is hung COMPLETELY above the window?  It makes the long thin window look taller and doesn’t block any of the much needed natural light.

The most dramatic difference was cutting down and framing the mirror (full tutorial here.)

Removing Sliding Glass Shower Doors (Flashback Friday)

Tutorial: How to Remove Sliding Glass Shower Doors
Welcome to another edition of Flashback Friday, where I look back at some of my favorite projects from my early days of blogging!

When we first moved into this house, everything was brass.  I mean EVERYTHING.  Lighting fixtures, door hardware, medicine cabinets, switchplate covers.. If it could be brass, it was!

One of the first things I did, was rip out the brass sliding glass doors which were on the girls' bathtub.  Not only were they ugly golden brass, but it was a GIANT pain in the butt to bathe your kids in a tub with doors. 

First you need to remove the doors from the track, and then remove the three screws on each side of the track that hold it to the tub surround (or wall.)
 

The track may still be stuck down with caulk or liquid nails, so just keep prying it up until it pops off. 

Once your tracks are off, it will reveal another reason that sliding glass doors are NASTY:

That is all the crap that collected under the track.  Disgusting moldy crud.  Fortunately it only takes a little elbow grease and a razor blade to get rid of it.  (I did have to bleach some of the caulk to get the discoloration off.)

Once you have scraped and cleaned off all the caulk, you can fill the screw holes with a marine epoxy or caulk if you are so inclined. (This is what I used.)  It will look better if they are filled, but it isn't 100% necessary since it is very unlikely you will get water in the holes.  I had light 'faux marble' so it was easy to match it to the white epoxy, but if you have dark tile, you would be better off using the clear.

After filling the holes, all that is left to do is hang a curtain rod and shower curtain and the project is (mostly) complete:

Once the doors were off, the brass fixtures were screaming to be replaced.  What should have been a straightforward project turned into a little bit of a nightmare because the valve which supports the shower handle would only accept Price Pfister faucets manufactured before 1994 (it was from the "09 series" in case you have one too!)

Therefore used an universal retro trim kit for the internal handle mounting hardware and splash guard along with the actual Price Pfister Pasadena handle, spout, and shower-head.
 
 (Since doing this project I have since learned that you can buy Pfister Retrofit Kits at the plumbing supply store or even Amazon which would make the retro trim kit unnecessary.  See how far I've come!?!)


The total cost for the entire project was about $150 for the new faucet hardware, curtain rod and curtain.  Plus I even had someone buy the shower doors to use in their rental property (Those poor tenants!)
Sharing at these parties.

Guest Bathroom Makeover (Flashback Friday)

Welcome to the first edition of Flashback Friday, where I feature old posts from my early days of DIY'ing and blogging!  You will have to excuse some of the photos, simplicity of projects and lack of decent tutorials.  I was just a baby blogger who was doing everything for the very first time.  
Back in April of 2011, I tackled a horrific guest bathroom in our 1905 Victorian townhouse we had bought only a few months before in Boston, MA. This house would later be known as The Money Pit, because of the nightmarish problems I encountered with every project.   

I was a BRAND SPANKING NEW DIY'r and I had never done a project anymore complicated than painting without the help of my dad.  I hated this bathroom soooo much, it was the push I needed to attempt my first plumbing project.  It was the success here that led me to tackle bigger and 'scarier' projects.  This was the project that started it all! 

This bathroom was on the main level of the house, and was the bathroom that all the guests would use. I was embarrassed to have people use it.  The giant WOODEN towel bar (which was actually moldy) and fleshy colored ceramic tiles which looked straight out of a Chinese restaurant.

The medicine cabinet was horrible and stuck out way too far (I would later find out why!) and the dressing room lights were extremely dated.   

The vanity was orangey oak, which  had gotten water damaged over the years.  Here is a photo of it once I removed it, you can see exactly where it sat next to the tub. Gross.  Here is the full tour of the "before" from back in 2011.

My budget for this makeover (which was pretty much an entirely new bathroom except for floors, tub and toilet) was $1000.   The vast bulk of the money ($550) went to having the walls and tub surround professionally reglazed pure white(since there was NO SAVING that ugly tile.)
$550 well spent!

I painted the rest of the room Martha Stewart's Brown Alpaca from Home Depot. (That paint brand is no longer available but you can still get the Martha Stewart paint line color in Glidden at Home Depot) .  

I also added a new white stock vanity, faucet, shower curtain and towel bars.  I also had grand plans to just wire in a new light fixture, but what I found when I removed the medicine cabinet made that impossible (especially for a first time DIY'r!)

The previous remodeler had illegally spliced Romex wiring into the house's original knob and tube. It was a fire waiting to happen.  And they hadn't even put in a junction box, just hid the splice behind the cabinet.   NOT COOL!  I had to hire an electrician for that part of the project.
 For additional in-progress photos, and more detailed descriptions of what I did, visit this old post.

So how did it look when it was completely finished?  


Here is a breakdown of my costs:

$550 Tile Reglazing
$148 Vanity
$36 Faucet
$28 Wall Paint
$20 Door Paint and Door Knob
$44 Plumbing Supplies (piping, trap etc.)
$93 Light Fixture
$47 Towel Bars, TP Holder, Shelf, Coat hooks
$30 Mirror
$3 Trim Molding (around vanity)
=============
$999 + $299 for electrician<---- b="">1298


The original reveal can be found here.

I would say it was a VERY VERY successful transformation, especially for a first time DIY'r!

Sharing at these parties.

 
Copyright © 2017 The Kim Six Fix. Proudly Blogging on Blogger