

In my recent Summer Gift Basket Post I included a custom tumbler I made using word art that was all the kids names in the shape of an apple.

I have had quite a few people ask me how I make the word art itself and how I am able to manipulate the words so that they are big enough to cut on my Silhouette.
There is a great free program that I use, called Tagxedo. However, when I first started using it I thought it was really confusing. There aren’t any good instructions available on how to work with it (especially to make the art itself simple enough to use as a cut file) so I thought I would share a tutorial on how I do it.
This also would is a wonderful way to produce printables and subway art if you don’t have a cutting machine. I used the same program to create large initials for the baby's nursery door, made up of his name and other "little boy" words:


So how do you customize it with the app? Here is a quick and dirty tutorial of just the highlights.
I am only scratching the surface with what this program can do, but this is enough to get you started.
When you first open up the Tagxedo app, the default graphic is a sample “Mother Earth” globe. You will also see the menu on the left side of the screen:

To start your word art, click on the “Load” option and paste in whatever words you want to use to make up your image. (Good things to use include poems, lists of adjectives or synonyms, or song lyrics. You also can past a url if you are interested in a ‘word cloud’ effect.)
Some of the menu options are self explanatory, but here is a quick summary of what each of the options does:

For my example (a Father’s Day hand print) I used a list of adjectives that could be used to describe a father. I chose a handprint shape. This was the default result:

It is super cute, but not at all useable as a cut file. Some of the words are way too small, and don’t have enough contrast to trace successfully.
First you want to turn all the words black. The easiest way to do that is click the arrow next to Theme and choose “Black on white.” You also may want to choose a larger block style font (the arrow next to Font) and change the orientation of the words themselves (random, horizontal, vertical, or orthogonal.)
Changing some of the options are obvious in the menu above (color, font type, orientation) but the key to a good word art cut file is having words that are large enough to cut. For that you need to manipulate the settings under the “Layout Options” menu.
This is what that menu looks like (and these are the setting for the blue hand image above):

There are a lot of ways to manipulate the words, but we are only going to focus on the top three menu items.
Maximum Word Count is another important setting. If you don’t have at least 200 words in your original word list, the Tagxedo app will duplicate some of them in order to fill the space. But having a lot of words also means the words themselves will be rather small. If you do nothing but reduce the total word count, you will end up with fewer words like this:

The problem is that there is still have a huge variation in size between the large words and the small words.
Emphasis is the setting that determines the difference in size of your words based on how many times those words appear on the list. You can see in the example above that words like Thoughtful, Means and Loving are larger than the rest. That is because they appeared (or were duplicated) more than the other words. To bring this variation down, you can reduce the emphasis. This will be your result:

Tightness is the setting that sets how closely packed together the words should be. If you want the least amount of space between the words, you can set the tightness to as high as it can go:

In order to get a design that is easy to cut you need to balance those three settings. Here is an example of how I have the settings for my father’s day handprint. You can see I reduced the word count and the emphasis (so I have fewer words with less variation). I also increased the tightness so the words are more tightly packed and it is easier to make out the silhouette of the hand:

I also changed the front to a block style and set the orientation to orthogonal. Here is the result:

That is a much simpler file. I left some of the variation (since I wanted emphasis on the word “Father”) but none of the words are really really small.
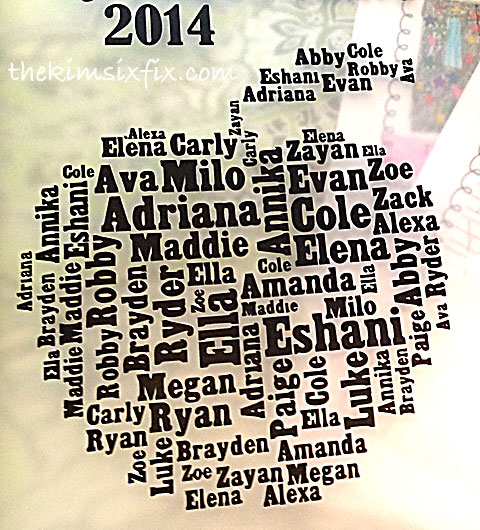
Here is another example file I used for the tumbler. In this case I turned “off” the replication setting because I wanted all the kids names to be represented equally. I instead pasted the class list in duplicate about 15 times, so that I could get a maximum word count to fill the entire apple (and allow for some variation in size.)

The file above is what you get when you use the save/export setting. In order to cut the file I just save it and import it into the Silhouette software and trace it. Because the image is black and white, getting a good trace is really simple.
Here is another example where I pasted a class list multiple times and manipulated the settings to get a result I could cut with my Silhouette. Here I used it on the front of a notebook cover which I filled with drawings from each of the students for Teacher Appreciation week:
It is similar to the one I used on the tumbler only this time I used the orthogonal orientation, instead of random:

Here is what the vinyl looked like coming out. The teenie areas inside the letters tend to tear out, but that isn’t a big deal since you would have to weed those anyhow:

I just transferred using contact paper, and because none of the letter were super small, it went relatively smoothly (You mostly have to watch out for the dot above the letters i and j):

I think the little 'book' came out darling. And it was relative easy for something that looks so complicated.
Once you have the program figured out, the entire process can take as little as 20 minutes start to finish (depending on how big your final graphic is and how long it takes for your machine to cut it.)
Much easier than trying to assemble word art by hand in a graphics program. That is for sure!
This post is NOT sponsored in any way. I just discovered Tagxedo and loved how simple it made word art. I have NO affiliation with the company.


Awesome...just pinned.
ReplyDeleteThis is great Kim.. I have a cutter and need to use it more.. Now I have a reason too. :)
ReplyDelete