Since I am redoing my kitchen, but working within a budget and with the cabinets I already have, I needed a way to get a more custom look. Enter: Open Shelving.
(EDITED TO ADD: Full kitchen reveal can now be found here)
It was a look I had pinned dozen of times on my "Kitchen" Pinterest board, but I didn't want it to look like I just took doors off a cabinet. I wanted it to look CUSTOM. So I looked around my kitchen and tried to figure out which cabinets I could easily convert yet wouldn't look like doorless cabinet boxes.
I settled on this one, which floats by itself next to the kitchen sink:
It is a single cabinet with double doors that was nothing to write home about:
I got a feel for how it would look by just removing the doors (that way if I didn't like it, I could always just put the doors back on):
 I was happy with the look, so I needed to deal with the hardware holes leftover from the hinges:
 A couple dollops of spackle (I love the pink kind that dries white) did the trick:
 Then I went ahead and removed the center support post (which really isn't "supporting" anything but the doors). I used a hacksaw to cut it in half and knocked it out with a hammer:
 Next up sanding and priming:
 A couple coats of paint (yes, this is the Manchester Tan I took forever to decide upon):
 Most people would have stopped there, but this doesn't look like much more than an empty cabinet. I took my inspiration from the open cabinet I loved on Pinterest and found these shelf brackets:
 I added them to the top corners of the cabinet and ended up with this:
 More spackle and another coat of paint.. but I didn't want to stop there. My inspiration cabinets also had a beadboard backing.
Now let me pause here to mention how much experience I have with beadboard, both the snap-in kind as well as the real stuff.. but I think my life is forever changed since I found this:
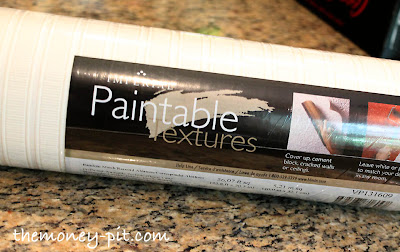 PAINTABLE Beadboard Wallpaper!! (I got mine on Amazon)
Where have you been all my life? This stuff is great. And although I have heard it can't handle a lot of wear and tear (so I wouldn't use it on a bathroom wall for example) it would have been a great solution to my DIY beadboard ceiling.
Anyhow.. I put the paper up in the back of the cabinet, cut it with a box cutter and painted it to match the rest of the cabinet (you could do a contrasting color, and I may change it in the future, but I wanted to try it out this way first):
 I caulked around the edges to hide any gaps (and it helped seal the edges of the paper down):
 A final coat of paint, re-install the shelves and you are all set!
 I decided to add my collection of Lennox serving pieces I got for my wedding. The cow is a creamer, and the chickens are salt and pepper shakers:
 The duck is a teapot, the bunny is a cookie jar, and the pig is a sugar bowl (you scoop out the sugar with his curly tail):
Of course I added my $2 chicken (affectionately named
Beyonce) that I couldn't pass up at the thrift store.
 Here is what it looks like from a distance. Not so much like a converted cabinet!
I am super happy with it!
Share this:
I recently removed Disqus comments and converted to the Facebook commenting system.
Thank you for your understanding.


Absolutely gorgeous! What great inspiration for me because I have opened up a cabinet recently and did not know how to finish it off. Love your ideas. Megan
ReplyDeletebeautiful job!
ReplyDeleteThat's absolutely awesome and it doesn't look like a converted cabinet AT ALL! It looks like a whole new piece of furniture ... and expensive, too. Your kitchen will turn out absolutely fabulous!
ReplyDeleteJule
LIKE!
ReplyDelete...and welcome to the beadboard wallpaper fan club :)
That looks incredible! Great job!
ReplyDeleteI love all the animals, too. They just make me smile :D
Great job! I love it. It looks like a seperate piece of furniture. Thank you for sharing the beadboard wallpaper! I had not heard of that. I want to do a closet ceiling and pantry ceiling with that! If I get industrious enough I will do the back wall of the pantry. I redid a kitchen cabinet years ago to look like a seperate hutch. I need to dig up the old "before" photos!
ReplyDeleteThank you for sharing!!
Ann
You NAILED it! Totally lost the cookie cutter kitchen look and am in love with your bead board wall paper.
ReplyDeleteI know you mentioned that it cant' handle wear and tear, how do you think it would hold up on the walls going down to the basement?
Most likely wouldn't put it up until we have all the big stuff down there though...
what a transformation! that looks amazing!
ReplyDeleteTotally awesome!!!
ReplyDeleteLooks so charming now!
--Katie
that looks so ridiculously good! ah, what one can do when one can paints! if i removed my doors, there'd be no painting and it'd look super cheesy.
ReplyDelete**Big smiles** That looks so great! I'm always impressed with your take charge attitude. You did a great job and it looks professional.
ReplyDeleteBeautiful transformation....loving it all & thinking about being a copy-cat!! :) Blessings!
ReplyDeleteThats brilliant! I love it! (and I want some of that beadboard paper!)
ReplyDeleteThe brackets definitely make it! Open storage scares me because our cabinet contents are, well, scary and I like to stash things in them and then quickly shut the doors. Maybe open shelving would train me to be more organized? :)
ReplyDeleteThis takes away my concern about mine looking like a cabinet with the doors off. Thanks! I'm going to follow you so I can steal more of your ideas. Pinning as well. ~ Maureen
ReplyDeleteYou did a great job of making this look like intentional open shelving! I love this look, but don't have a place in my kitchen where it wouldn't look contrived.
ReplyDeleteIt turned out great!
ReplyDeleteI was just talking with my sister about how she wants to redo her cabinets. I'm going to show her this! Thanks for sharing!
ReplyDeleteThis is so great! Love it and so inspiring. I hope you will link this up to The CSI Project this week. The challenge is Kitchen makeovers and decor.Tomorrow the competition will start. Come on over to see kitchen tutorials.
ReplyDeleteIt is fun and you just might win. A new craft challenge every week.
www.thecsiproject.com
PS I am going to feature this on my FB page!!!
ReplyDeleteThis looks great! I've been toying with the idea of doing that to one of the cupboards in my kitchen and I think this has convinced me! Pinned!
ReplyDeleteThat is absolutely fabulous! (and I don't say that to anything but the best) You are truly an inspiration. So is that the color you are going with for all the cabinets? That is going to look soooooo good; I can hardly wait to see what everything looks like when you bring it together :)
ReplyDeleteWow! What a great idea! I love that paintable wallpaper/beadboard!
ReplyDeleteYour cabinet-turned-open-shelves turned out beautifully! I've been wanting to do this to a few of the cabinets in our kitchen (once we have the extra $$), and now I know where to go for the perfect tutorial! Thanks so much!
ReplyDeleteFantastic! I love it.
ReplyDeleteWow, that is absolutely gorgeous. What a transformation. It's such a great idea.
ReplyDeleteThanks for the inspiration!! I want to do this to a couple of our cabinets:)
ReplyDeleteGreat inspiration and great blow by blow instruction! I have just opened up a kitchen cabinate that extends out over the counter and thought I was finished, but now realize that it is crying for the top corner extras!
ReplyDeleteThe shelf brackets in the corners make such a huge difference in the look. Great job and terrific instructions!
ReplyDeleteYou did a great job and it's gorgeous!! Happy weekend.
ReplyDeleteFABBY
I've been thinking about doing this for a while now and this post has pushed me right over the edge! Thanks for the push!
ReplyDeleteThat looks awesome!!
ReplyDeleteWow! That certainly looks like a custom display cabinet and not a cup cupboard!! Great job! Thanks for the DIY details and the inspiration!!
ReplyDeleteThe brackets added & removing the center support really do add so much to the final result, but I am posting to say how much I love your serving pieces!! They are adorable, I hadn't seen this design before.
ReplyDeleteOh my gosh! Looks fantastic! Look at what you get with lots of hard work!
ReplyDeleteI love the beadboard wallpaper you put in the back! :)
~Lisha
Taking it one step further really made the cabinet look like it was an open shelving cabinet rather than a cabinet with the door off. Hats off to you for thinking outside the box! The beadboard wallpaper was the perfect finishing touch. Pinned it :)
ReplyDeleteGreat upgrades - very pretty!
ReplyDeleteThanks for sharing - Stacey of Embracing Change
oh my gosh, love the new look of your open shelving cupboard! tooo pretty!
ReplyDeletegail
So cute! I should do this with a few of my cabinets!
ReplyDeleteThis is great. Thanks for the inspiration. New follower!
ReplyDeleteJust gorgeous! Love how you customized this with the simple corners! Genius :-).
ReplyDeleteI want to be you! Love love love it!
ReplyDeleteThanks for sharing all of your ideas and tricks. How did you attach the corner brackets to the cabinets?
ReplyDeleteI used liquid nails. They were really light and I knew they weren't going to get any wear and tear. Also make sure you caulk the gaps so they look like they are carved and not just tacked up there. :)
ReplyDeleteWhen I click on "framing a mirror without..." it takes me to this.
ReplyDeleteThis is just what I've been looking for to save hundreds of dollars on putting new doors on 65 year old cabinets. Thanks for your inspiration!
ReplyDeleteWhen I clicked on the link to make the mirror frame, it took me to this link for the cabinet. Can you provide the link for the mirror project? Thanks!
ReplyDelete