s December 2012 - The Kim Six Fix
What is New?

Master Bathroom Remodel: Vanity Countertop Demo

I hope everyone had a wonderful holiday! I have been on a small blogging/DIY hiatus, but thought it was time to give you an update on the progress in the bathroom.  Since the tilling is finished (HURRAY!) it is time to get away from the shower/tub and move onto the vanity.  That means once again, it is DEMO time! 
If you remember from the before photos of the master bathroom, I have a golden oak vanity, with engineered marble counters and lovely (gag) brass and 'crystal' fixtures:
It also has wall to wall mirrors that just won't quit:

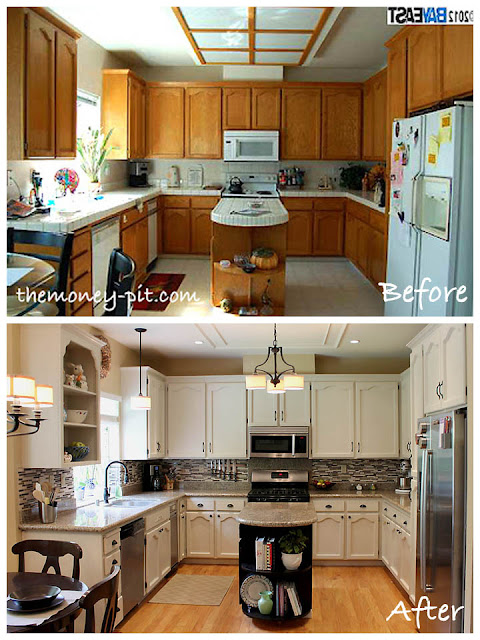
I hate it ALL, but unfortunately the budget doesn't allow me to get new cabinets.   On a bright note, you have seen how pretty these EXACT awful cabinets can be when painted/stained in the rest of the house. 

For example: off white in the kitchen (with a dark stain on the island):

Or painted dark brown in the my other bathroom:

So once again, I will be tackling another cabinet painting/staining project

However, there is NOTHING that can be done to save those gross countertops and mirrors.  They have to go.   So I pulled the mirrors down and unhooked all the plumbing:

After the mirrors were down (and the room no longer felt like a funhouse) I was able to pry the countertops off.  This was actually pretty easy since they weren't really attached to the cabinets. The weight of them (along with a thin line of caulk at the wall) was all that was holding them down.

The last thing I did was pull out the old medicine cabinet. I discovered some interesting wallpaper behind it.  Hmm.. I think I had a dress made of fabric that looked *just* like that back in 1992!  

Now I will have a stone company come out and install new marble slab countertops.  I decided to go with Crema Marfil marble. I wanted something light since the cabinets are going to be dark.  I also want it to play nicely with the travertine.  Here is my inspiration photo off my bathroom Pinterest board which shows creama next to another natural stone:
image source


Pretty dontcha think?  Well.. anything has to be better than what I am starting with! 
Pin It

Yes, yes, yes.. We Have An Elf on the Shelf

Love him or hate him.. it looks like he is here to stay.  And since I have two young children, of course our house has an elf on the shelf. There is one thing you need to know about our elf, who is named 'Elfie' by the way (I guess the creativity gene hasn't activated in my children yet!)  Our elf doesn't make much mischief.. he only gets into scenarios that takes 10 seconds or less to set up.  Elfie is lazy.  He doesn't make messes and he goes for the 'less is more' approach.  Our holidays are busy enough without an over-achieving elf! 
 This is our first year with him making his daily mischief, and I thought I would share a few highlights (Sorry! I just can't help myself!)
Elfie taking a spa day in some cereal

Elfie says hello to baby Jesus

Elfie swinging on the girl's ceiling fan:

Elfie trying to blend in with some snowmen:

Elfie caught wrapping some last minute gifts:
Pin It
I have to admit, I won't be super sad to see Elfie head back to the North Pole now that Christmas is almost here.  There is always next year! 

Christmas Decorating 2011 vs. 2012

I know I already posted my home tour for Christmas this year, but bear with me on this post.  I was looking at my photos (which I have never posted here) and realized just how different the same decorations could look from year to year.  Last Christmas we had only been in the house about 3 months and were still in the process of moving in so the decor is much more low key.. I thought it was fun to compare and contrast how everything looks then and now. (Forgive the old photos, I was using my old point and shoot camera back then)

The living room in 2012:

 2011:
They look really similar.  Last year I went with red, green and gold.   But this year I went red and silver.  It is most obvious when you compare the mantlescapes:

2012:

2011:
 
I personally prefer my current mantle, but I do like the clusters of poinsettias from 2011.  And you can definitely see I like to use cheap plastic dollar store ornaments as vase filler.. I guess that never gets old.

2011:

2012:

Last year I only decorated one mantle (my formal living room) and so the stockings were hung there:

But this year I decorated both of my fireplaces, so the stockings were relegated to the kids' playroom:

The tree itself never changes.  I put on every ornament in my stash every year.  They hold so many memories and pulling them out, one by one, is a tradition that never gets old:

The dining room is pretty different this year.  I admit, although I like the chandelier more this year, overall I like the 2011 version better.  I think the gold and green against the gold walls is washed out.  The green and red (especially around the mirror) is a nice pop of color.

2012:

2011:

I was delighted with my 99 cent poinsettias both this year and last, but  I had to skimp out on my stairs since I used half of them around my fireplace last year. I still love the look:

2012:

2011:

And no matter how the rooms are decorated, there is NOTHING more beautiful than seeing my kids rush down the stairs on Christmas morning.  Here is my (then) 2 year old coming down for the first time. It makes me nostalgic to think she is going to be 3 when she walks down the stairs a few mornings from now.

Wow! How time flies!
Pin It

Personalized Hershey Bar Owls

Pin It
Every year for the kids' birthdays we give away favors to the kids in their class. I am always looking for ideas for what to give away that isn't a little baggie full of cheap plastic junk from Oriental Trading.   When I came across the idea of a single personalized Hershey bar I knew I had found it, especially since I need to make 24 of them.  I have seen little snowmen and reindeer and santas but I needed something more generic since it was for a birthday favor and not for Christmas.
In this case I needed an entire parliament of owls (yes, parliament is the correct word for a group of owls.)

I saw on Pinterest that Katie at Stamping Steps was offering up this great free printable for an owl wrapper.  I downloaded it and edited it in Photoshop.  Her original sizing was a tad too small for me, so I stretched it out and changed the wording:

I then wrapped a single candy bar in the print out making sure to center the owl and leave enough room above the head to add a fleece hat.
  

Here are two examples of original print out and the stretched on.  You can see they would both be cute, but I wanted to eliminate the white space below the owl's feet. 

I cut a square of fabric about 6x6 and used school glue to turn up one edge for the brim of the hat:

Then I flipped it over and glued it to the top of the candy bar:

Wrap it around and secure it to the back.  It will be a long thin tube at this point:

I used a ribbon to tie the top of the hat with a bow:

Then snip the top of the hat into about 1/2 strips to make the fringe on the top:

And you have the finished product:

Super cute and affordable.  All the supplies cost around $10 for 25 bars. The key was finding the candy on sale (I got lucky and got them for 3/$1 at the drugstore) the only other supplies are the ribbon and small piece of fleece.

Master Bathroom Update: The Shower is Done!

I know I haven't posted a bathroom update lately. Honestly, I haven't been working on the bathroom lately.  Other things have been on my mind.  Getting ready for Christmas, and preparing for my 6 (going on 7) year old's birthday party. 

Originally I was going to post about her party this week.  It was a winter theme with a hot chocolate bar and christmas cookie decorating, but in light of the tragic events in Connecticut, I just didn't have it in me to write about it right now.  My heart goes out to all those families who won't be celebrating another birthday with their 6 year olds.  Since my daughter is exactly the age of the school children victims it is hard not to put myself in the shoes of those parents.  There is nothing I can say that hasn't been said before, or that could sum up the tragedy of the situation, so I will leave that other more eloquent people. 

Instead I will share one quick update on the bathroom that is pretty exciting for me.  The frameless door finally went in and now the shower is complete! 

For the full impact of the change check out the before and after:
Pin It

I am absolutely delighted! Now to just keep plugging along on the rest of the room. 

Budget for this part of the remodel: $1331.30
Sanded grout: $27.10
Sanded caulk: $13.76
Credit** for extra tile +$119.56
Glass door plus install: $1410.00
Renovation total to date: $2506.45

**I originally purchased excess tile and included in the budget. I was able to return the extra tile at Lowe's for a credit, which is why I didn't purchase the tile directly from the tile store. 

Christmas 2012 Home Tour

Pin It
Since I already posted about my exterior holiday decorations, I thought it was time to give you a little tour of my interior all decked out for Christmas. 

First up: The Formal Living Room
This is the room where we have set up the tree and open our presents on Christmas morning.  My favorite part is the mantle:
 It is done in silver and red, and features lots of great dollar store finds along with a few things I got on clearance at Ikea last year.  The iced silver wreath on the mirror came from Home Goods after christmas last year and was only $8. 
 The kids and I glittered some pine cones for an added sparkle, and the lanterns were on sale after Valentine's day for $5 at Ikea.
All the ornaments came from the dollar store and fill thrift store vases I've been accumulating.
Just off the living room is the Dining Room:

I was able to snag a dozen live poinsettias on Black Friday for 99 cents each and they line the stairs.
The other side of the bannister is swagged with lit greens and features an old set of stockings that came from my husband's family
The more whimsical part of the house is the Family/Play Room:
This room is decorated with all the kid's favorite christmas things: Nutcrackers, gingerbread men and christmas books.   
Our embroidered family stockings hang on this mantle
And the nativity is set up on the side board:
Even the display shelves in the Kitchen got a little Christmas-fied.  

Lastly,  I swagged the top of the kitchen cabinets to unite the space.

It definitely feels like Christmas! I know the kids think so.


Sharing:


Copyright © 2017 The Kim Six Fix. Proudly Blogging on Blogger