

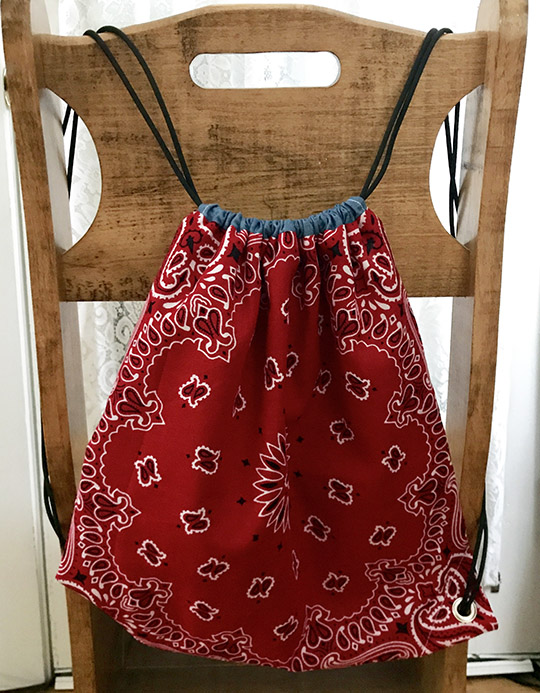
My son is headed to an amusement park with our youth group next week and was looking for something to carry his hat, sunscreen, water bottle and a few other odds and ends. He wore out his last drawstring backpack but it was still lying around, so I grabbed it for size reference and whipped up a new one.


This is such an easy project! It uses grommets to hold the drawstrings in place at the bottom, but if you have the right tool you can install them in no time. Don't let them scare you off!
For one backpack you'll need:
- Two bandanas
- 1/2 yard of fabric for the lining
- 4 yards of paracord for the drawstring
- Two 3/8" grommets
- A grommet setting tool (I found this one at my local fabric shop)
From the lining fabric, cut the following pieces:
- Two 16" x 16" squares for the bag lining
- Two 15-3/4" x 2-1/4" strips for the drawstring casing
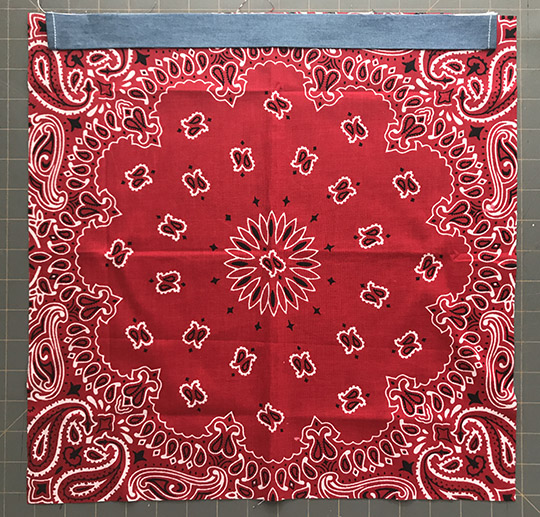
Trim the bandanas down to 16" x 16". If your bandanas have an allover pattern, you can cut them any way you'd like. Mine had a center motif that I wanted to keep, so I folded each bandana in half, measured over 8" from the fold and trimmed along that line.
Then I opened them up, folded them in half again with the remaining raw edges together, and measured over 8" from the new fold. One last trim and I now had two 16" squares with a centered design.
Fold in the short ends of the two lining pieces by 1/4", then 1/4" again to enclose the raw edges. Stitch along the fold line.
Fold the lining pieces in half, right sides together and matching the long edges. Press the pieces.
Lay a bandana panel on your work surface, right side up. Lay one of the casing pieces on top, centering it on the bandana piece and lining up the raw edges. The bandana should extend about 1/2" beyond the casing on either side.
Lay a lining piece on top, right side down, with the casing sandwiched between the bandana and the lining.
Stitch the pieces together with a 1/2" seam. Repeat for the remaining lining, casing and bandana piece.
Press the two assembled pieces with the seam allowance facing the lining.
Pin the assembled pieces together, right sides facing. The two lining pieces should be on one side, and the two bandana pieces should be on the other.
Sew all the way around the assembled pieces, leaving about 3" at the center bottom of the lining open for turning. Make sure you don't catch the ends of casing pieces in the side seams!
Turn the bag right side out through the opening and hand stitch or machine sew the opening shut. Press all the seams.
Tuck the lining down into the bag and press again. Make sure you get the bottom corners of the lining pushed all the way into the corners of the bag.
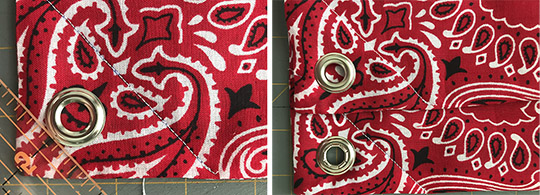
Measure in 2" from the corner points and draw a diagonal line across the bottom corners of the bag. Stitch along both lines.
Center a grommet in each of the bottom corners and follow the directions on your setting tool to attach them through the corners.
Cut the paracord into two pieces, each 72" long.
Wrap a piece of tape around one end of the cord to keep it from fraying and use a large safety pin to thread the cord through one side of the casing, out the opposite end and back through the other side of the casing. You should end up with both raw ends of the cord at one end of the casing, like this:
Repeat for the other cord, starting and ending on the opposite ends of the casing.
Thread the raw ends of the cord through the grommets and tie them together in a knot. Remove the tape, and melt the tips of the cord with a lighter to prevent fraying.
All done!
I love the red & white version, but I'm already eyeing bandanas in our school colors to make band camp backpacks. These would be cute for vacation bible school, too, and they're not too big for younger kids.


