

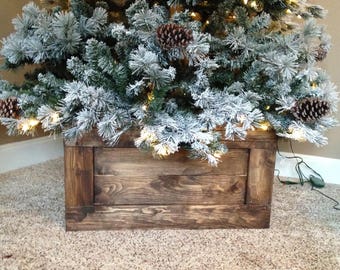
For Christmas this year I built a wooden crate to hold one of my Christmas Trees. You also could use it as a planter (I may add a boxwood or something to it after Christmas is over.)
If you aren't a builder but would rather BUY a wooden crate, scroll to the bottom of the post to see where you can find them commercially!
 Right now it is in the playroom with of my smaller trees, but for a while I had it set up outside on my front patio. I actually want to make another one for my other trees!
I also love the weathered driftwood finish. This is the first time I attempted that and I know I will be using it more often, I love how it came out.

So how did I build it and stay within the rules of the challenge (no new materials.. only use scraps you already have lying around)?
Well, needless to say, I had a ton of pieces of scrap lumber, since I never throw anything away. .
 For me the biggest problem is that they were all random sizes, widths, and even THICKNESSES. I had 2x4s, 1x3s, 1x5s, old pieces of pallets, some fencing, 2x2s, trim boards and a ton of cull lumber that was in bad shape or warped.
After standing back and studying my stash I realized I had the most length in the left over pieces of tongue and groove boards I used to make my West Elm Inspired Mirror. I used the “groove” side and cut off more than half the board with the tongue (the large pieces in the photo below).
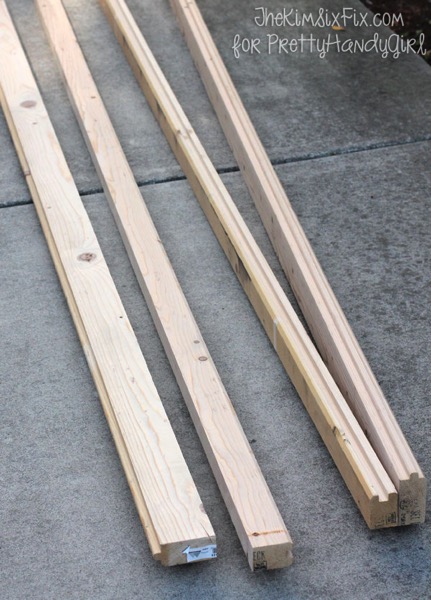
I wanted to reuse those boards but I had to cut the tongue off and make them all a standard width.

 Once again I used my Kreg Rip-Cut. and it worked great. I was left with “nearly 2x4” boards. (they were more like 2x3.5) Because these boards are cut down by hand, I’m not including measurements for this post.. since none of this is standard lumber.
I didn’t have enough of my ‘2x4s’ to build the whole box, so I had to improvise with some 2x2s on one side.

Next I had to make the inset boards for the flat areas of the box. I didn’t have enough plywood but I did have LOTS of random boards in various widths. Enter the pocket hole Jig (in this case the Kreg K4)

I laid the boards flat on the ground and attached them side by side with pocket holes. The key was keeping one side FLAT adjacent the floor.. Since the boards were all slightly different thickness the backside of the boards are not level, but that doesn’t matter since it is the inside of the box. Once I had bunch of boards put together, I snapped a line for the correct total width and ripped it down with the Rip Cut.

Next I had to insert the panels into the frames. I used blocks to make sure the overhang of the frame was exactly the same for all the boards. Since some of the boards were warped and different thicknesses, once again, it only mattered what they looked like from the outside..

So you can see the inside is kinda a mess of random boards. Ah yes.. the beauty of working with junky scrap lumber.
 I assembled the final box and then it was time to trim it out. (The box has no bottom or no top.. I may convert it to a planter later so I didn’t think it needed a bottom)
Since (per the challenge) I couldn’t buy trim for the outside, I used some old shims I had leftover from my valentine’s day heart I made last year. They weren’t long enough to go end to end so I had to butt them up end to end and then cut the corners off with a box cutter. Because they are shims they are tapered, so I always had the thick end in the center of the X and cut off the thinner end.

I used glue and finishing staples to hold them on.

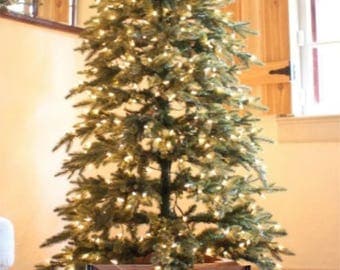
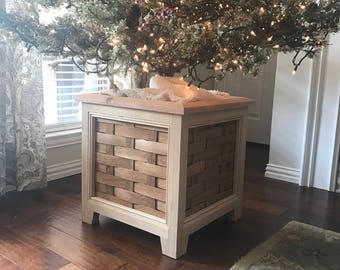
And here is the finished box. I didn’t want it to be raw wood so I used a sample of “Driftwood Weathering Finish” I received at a blog conference.

That stuff is really cool. You just add the powder to water and then paint it on your piece. It gives a different result depending on the wood type (you can see the one dark redwood boards on the left side of the box in this photo) I loved how it looked old and sunbleached. Like this was really an old crate.
So.. how did I get the tree to stand up in the box? Well.. I couldn’t use the stand that came with the tree.. I had to create a smaller one. For that I used a small trick or treat bucket and a length of PVC pipe I had leftover from the DIY Soccer Goal. I first taped the bottom of the pipe so no concrete would get inside.
 Then I mixed up some mortar mix and inserted the pipe into the center.
 Let it dry a few hours and cut the pipe down with a pipe cutter or hacksaw.
I put it in the center of the box (I had to prop it on top of a paint can to be high enough)

And I added my tree.

You guys.. I just love this so much! I may use it on my real full size tree next year. (this is my space saving smaller tree that goes in the kids’ playroom) because it came out so much better than I thought it would. I’m so glad Sandra challenged us to this!

Commercially Available Christmas Tree Boxes:

A cottage in the city:

Now it is time to share your projects, or see the other bloggers who stepped up the sCrap wood challenge.

Here are the details for the sCrap Wood Challenge: Anyone who want to participate is welcome to join. If you blog, you can link up below.
If you don’t blog, share your project on Instagram, Facebook or Twitter and use #scrapwoodchallenge and tag @SawdustGirl so she can see what you made and maybe feature you!
Rules: No new lumber can be purchased, it must come from your scrap wood pile or some free wood you found on the side of the road.
You may use new fasteners, glue, paint, stain or whatever finish you want.
This is a building challenge, so no refinishing projects. Sorry.
This is a “Just for Fun” challenge to use up some of those scraps. There is no judging and no prize other than your own satisfaction for a job well done! (And hopefully a smaller scrap pile.)
The link up will close next Monday (Nov 29th) so you don't have much time..


