
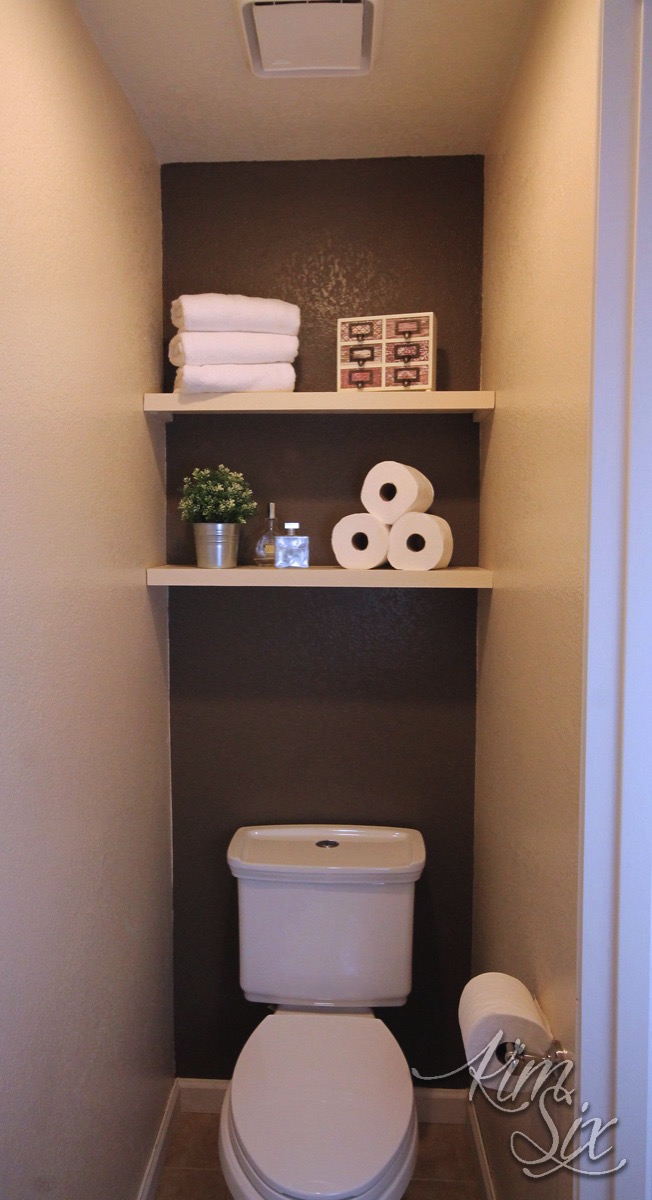
I recently redid my master bathroom water closet, and one of the things the space needed was storage, so I added some simple shelves to the room.
There are a million ways to install shelves, but when you are going the completely width of the space, putting the supports on the side walls is definitely the easiest and the most budget friendly.
My shelves cost a whopping total of: $5
Budget Friendly Floating Shelf Tutorial:
I’m going to use my room’s measurements as the example, but you could modify this to almost any size space.First you need to know how wide the opening is (in my case it was the wall to wall distance) and you also need to know how wide your want your shelf to be. I didn’t want it to hang out over the toilet tank (so you wouldn’t be sitting “under it” if you were on the toilet) so mine was slightly smaller than the width of the toilet tank.

My space was 36 inches long wall to wall, and the toilet tank was 8 inches wide.
My Supply list:
6’ - 1x8 common board: $8
1’ - 3/4 x 3/4: $0.79
8’ - 1x2 furring strip: $0.98
Hand or Miter Saw
Nail Gun or Finishing Nails
Wall Anchors or Screws
Level
Paint (optional)
This is how my boards ended up being cut down:

I used a 1x8 for the shelf and I cut it to 36 inches wide. I cut the 1x2 the same width (this is to create an apron on the front of the shelf to hide the supports. Finally the square molding is used on the side walls as the support. I made these 2 inches shorter than the width of the shelf board.
Installation:
If you can find a stud that is best, especially if your shelf is going to hold a lot of weight (like books or heavy objects.) I didn’t have any studs within the first 8 inches of my wall, so I used HEAVY DUTY shelving drywall anchors to support my shelf. I used a level to make sure they were installed at the same height and I painted them to match the walls.

Next I used the railgun to attach the apron front to the shelf. If you wanted to hide the bottom side of the shelf you could add another board to the bottom (forming a U). I didn’t care that much so I didn’t bother.

Next I did a dry fitting to make sure everything fit, was level and looked okay and made any adjustments. Sometimes your walls are perfectly square and you may need to sand or cut down on end.

Once I knew they all fit, I painted the shelves the same color as the walls and did the final installation. You can nail the board to the support or just let gravity hold it in space. My fit was so tight I wasn’t worried about it tipping forward so I didn’t nail it down.

All that was left now was staging the shelves with my cute bathroom accessories. You may even recognize that Jewelry Box from it’s makeover.

Quick and easy.. it took me less than an afternoon and only cost $10 all together. That is the kind of project I love!


