
Supplies
- Tri-fold poster board (or plywood or large canvas)
- Papier-Mache pumpkins
- Craft knife
- Orange paint
- Metallic dark blue paint
- White paint
- Paint roller and paint brushes
- Florists wire
- Wire cutters
- Awl or hole punch tool
- Battery operated twinkle lights (preferably with a timer)
- Electrical tape
- Removable adhesive wall hooks
Directions
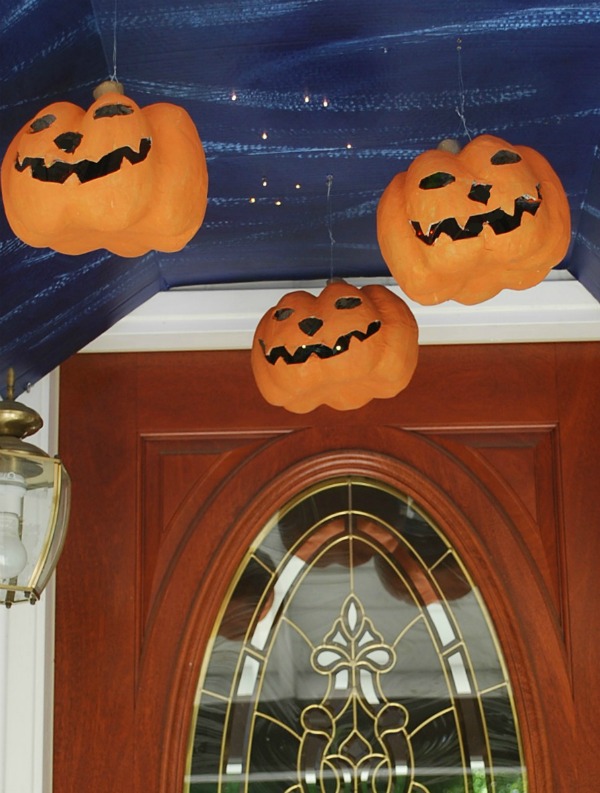
I used papier-mache pumpkins because they're lightweight and easy to carve and paint. I drew a simple Jack-O-Lantern shape and carved it with a craft knife. Then, I painted them orange.

While the pumpkins dried, I painted my poster board. I used the tri-fold cardboard kind again because it is lightweight and inexpensive. Plus, my front doorway is narrow so I could fold down the sides a little bit to create sort of domed ceiling effect. I first painted my poster board in metallic dark blue paint.

When the blue paint dried, I dabbed some white paint onto a paintbrush and blotted it so the paint was almost dry, and brushed it in broad strokes across the poster board, to create sort of a cloudy effect. To blend the white paint a bit, I rubbed the white paint strokes with a paper towel before the paint dried.


Once the paint has dried, you're ready to poke holes in the poster board from which to hang the pumpkins as well as to insert your twinkly lights. My twinkly lights had 15 bulbs and has a battery pack with an on/off switch, plus it has a timer to stay on for 6 hours and off for 18, so I won't have to climb up and turn it on and off each day. I turned over the poster board and used my hole punching tool (which can poke holes in the middle of your work). You can also use an awl or even a pen or pencil, just protect your work surface underneath. Make sure the holes are big enough for your lights but not too big so they don't fall through. Secure the lights and battery pack with electrical tape to the back of the poster board.

Now to prepare the poster board for hanging from the ceiling. Because the sides will be folded down, I'll be hanging mine from the middle section of the board. You might do something different depending on what size or material you use for your ceiling. So what I did was I poked six pairs of holes in the middle section of the board, then I looped a length of florist wire through them for hanging.

Then I poked a pair of holes in three places in the cardboard for each of my pumpkins. I also added a loop of wire through the pumpkins for hanging, and looped them through the holes in the cardboard.

I almost forgot! Before you hang everything up, slip in another set of string lights into each pumpkin. I used red lights (from Christmas!) but you can use orange or white lights. Again, it will save you a lot of work if you use lights with a timer.

I hung six hooks on the ceiling corresponding to the six wires looped in my cardboard, and hung the whole thing up. I will be adding a row of floating candles or a piece of dark blue fabric or cardboard to disguise the top.

Rather than hang more wires, I used hooks on the sides of the doorway to prop up the folded edges.

View from the front, as you walk up to the door.
And a view of my Hogwarts Bewitched Ceiling Halloween Porch, looking up (daytime). I think this is the first time I've appreciated my narrow doorway, because I love how I could create my "domed" ceiling. But you can adapt this to any sized porch ceiling, whether large or small.

And here it is at night! I'll be adding a flickering light bulb to our porch light for a lightning effect! Wooooo. You can also hang battery-operated candles as well as bats, which aren't shown in the movie but are mentioned in the book. If you're better at painting than I am, you can paint a shadow of the actual Hogwarts Great Hall ceiling. Plus you can add lanterns and gargoyles along the sides.

Hope you'll visit my blog, The Silly Pearl, in next few weeks to see my upcoming Harry Potter Halloween Porch projects. And click the links below to see my previous Halloween Porch ideas!


Happy Halloween! -Steph @ The Silly Pearl


